Aster’s new Lion kit: A review
by Marc Horovitz
Back to Sidestreet Bannerworks
Aster Hobby Company, Inc. of Japan
Available in the USA from:
Hyde-Out Mountain Live Steam
89060 New Rumley Road
Jewett OH 43986
Prices: See text
All metal, pre-machined, mostly pre-painted kit for 0-4-2 Lion; single, D-valve cylinder geared to axle; slip-eccentric reversing; alcohol fired, chicken-feed system; JvR type C, internally fired boiler. Boiler fittings include throttle, blower valve, safety valve, check valve for filling, screw plug for add-on fitting. Length of loco and tender, over end beams, 11-3/4"; width, 2-5/8"; height, 5"
Pros: No machining, drilling, or other metalwork necessary; most painting done; relatively easy screwdriver assembly; some tools provided; excellent instructions, both text and pictorial; good first project for a novice
Cons: Some painting suggested (not required); suction fan necessary for startup not supplied; no direct access to boiler after assembly without removing dummy dome at rear
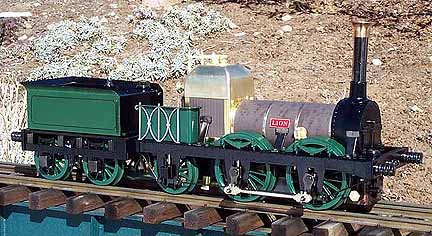
Those of you who are railway historians, or who have seen the 1952 British film The Titfield Thunderbolt, will be familiar with Lion. The prototype entered service on the Liverpool and Manchester Railway in 1838, making it one of the oldest locomotives to be commercially modeled in live steam. The locomotive exists today, still sporting many of its original parts, and still in running condition.
Aster’s model follows standard Aster practice. Two sets of instructions are provided—one written and one pictorial—to be used concurrently. The written instructions include a brief history of the prototype; general assembly notes, including a list of necessary tools; and a complete section-by-section parts list. Following this are the actual building instructions. The manual finishes with a discussion of the important parts of the engine, safety considerations, and operation instructions. The pictorial instructions show the various stages of assembly in a series of excellent, exploded views.
Aster is advertising this as a kit suitable for beginners, and I do believe it is. The instructions are a cut above Aster’s usually good instructions, the engine is mechanically simple, plumbing has been kept to a minimum, and the design, as all of Aster’s designs, is ingenious. Parts are packaged in plastic bags that correspond to each assembly section.
Construction begins with the single-cylindered steam motor, which is built as a separate, complete unit. Valve setting, a real bugaboo on some engines, is simplicity itself on this one. Once the steam motor is running on compressed air (all explained in the directions), the boiler can be tackled. Once the fittings are on, the wrapper and external details are added. The boiler wrapper is supplied as bare brass, but it replicates wood cladding. It is up to the builder to paint it or not. Suggestions for painting are supplied. I painted mine brown. The smokebox is lined with ceramic paper for insulation and the smokebox and stack are mounted to the boiler.
When the boiler is finished, the rolling chassis is constructed. Everything is straightforward. There is some cosmetic wire bending for the chassis that might be a little problematic for those not used to it, but it is not too difficult. Also, I had to file the frames a little to get the axle boxes to slide in smoothly.
When the chassis is finished and rolling smoothly, the boiler is mated to it, the firebox installed, and the boiler plumbed to the lubricator on the chassis. Siderods are added, as are detail parts and the dummy “haystack” dome at the rear of the boiler. The burner is packed with fiberglass wicking and installed, and the steam motor is mounted to the chassis beneath the boiler. With the locomotive complete, construction of the tender is simple and relatively quick.
There were a few small glitches in the instructions, but close study of them and the drawings sorted them out pretty well. While this kit is simple as Aster kits go, this is not to say it is a simple kit. The instructions must be read carefully and understood, or there may be tears. Patience is required, as is perseverance. If you are not possessed of these qualities, you might think twice about an Aster kit. However, if you have always wanted to tackle a live-steam kit, this one may be a good one for you. A week or ten days of evenings should see it together.
Operation is typical of most steam engines. I oiled it all around, filled the lubricator with steam oil, and the tender tank with alcohol. The boiler is to be filled with 60cc of distilled water, using a syringe via an ingenious fitting in the tender. You can also remove the boiler top and fill it through the safety-valve hole or the extra plug. I chose to use the tender fitting and found that the syringe provided with the engine was too small for the fitting. I slipped a short piece of rubber hose over the syringe tip, which worked OK.
Here’s a problem. The boiler is quite small and there is no way of knowing how much water is in it, since no water glass is fitted. It’s a bad idea to boil it dry, so how do you know how much water to add without over filling? There is no way of knowing, except through practice. On most engines, the safety valve or filler plug can be easily removed and you can have a look inside, or reach in with a syringe and suck out excess water. On the Lion, to remove the safety valve, you must first remove the dummy dome that covers it. This is not a huge problem, as the dome comes off with three screws, but it is a nuisance.
A suction fan (not supplied) is required to draw the fire when starting up. I placed mine in the smokestack and turned it on, then opened the fuel valve and lit the fire. I was over-eager and tried to start the engine too soon, opening the blower valve before pressure was fully up. The result was that the pressure dropped quickly and the fire went out. The next time, I let the pressure come up to blowoff (approximately 50 psi). Then I turned on the blower and removed the fan. I opened the throttle and pushed the engine forward to clear the condensate from the cylinders. Since the engine has only one cylinder, it will not self start. Once the cylinder had warmed up, the engine took off on its own. I left the blower open a little to ensure draft.
The instructions imply that the engine may not be quite up to snuff straight away, and that its performance will improve as it wears in. However, our review sample ran beautifully, including at relatively low speeds (more difficult for an engine with just one cylinder). I found it to be pretty controllable, though the throttle is a little touchy and the engine will run away if you’re not careful. The first run lasted perhaps five minutes. This is a little engine with a tiny boiler. As such, its duration will be limited, but both fuel and water can be replenished while the boiler is under pressure, so it can be kept in steam indefinitely. However, the small boiler is very sensitive to change and a big influx of cold water all at once will kill the pressure. Better little and often. Like most live steamers, this one will take some practice before offering its best performance.
The locomotive is supplied in two versions. The Lion kit is $1,185; built up is $1,385. The Titfield Thunderbolt version is $1,195 for the kit or $1,395 for the r-t-r version.
All in all, niggling quibbles aside, this is a fine locomotive and a fine kit. I recommend it to all who are interested.
Back to Sidestreet Bannerworks
This page and its contents copyright 2001 by Sidestreet Bannerworks